 |
| Playing with lava! |
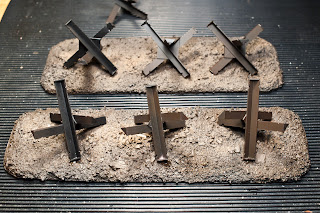
I started painting the bases with Vallejos Black Lava. This is a favorite of mine nowadays. It really adds subtle texture to the (already textured) base. It also acts as a sealant and primer in one.
 |
| VMA Camo Black Green, Burnt Umber & Mud Brown. |
The next step is to add some colour to the bases. This will of course vary depending on how your game table looks. The important thing to have in mind when colouring bases is to use one or two muted colors and then add a much lighter one to break up the surface. For these I used two dark brown VMA colors and the light Mud Brown in splotches here and there. Kinda like an area highlight. These will be drybrushed later on when we've mounted the hogs in place. So onto painting the hedgehogs.
Basecoat them black and then add some thinned Hull Red (1:1 ratio colour to thinner) to give the appearance of rust preventing primer or something like that. The reddish tint almost looks like rust already. Something we'll add a plenty once they're on the base.
 |
| A closer look at the hull red tint. |
Time to add the hedgehogs to the bases (finally!). I prefer to use a thick cyanoacrylate glue for this. Glue them on and wait for the glue to set! This is important since we'll be drybrushing these next and it sucks to pick up superglue with your drybrush. Why I don't drybrush these before adding them to the base is also to add some lightning to the hogs. The underside won't reflect light, so there's no need to drybrush those parts. Right? :)
Now drybrush the hedgehogs. I used Citadel Boltgun Metal + Black — in a 1:1 ratio — all over the hogs and then a light drybrush of pure Boltgun Metal on the upper parts and edges.
Decision time! If you want static grass on your bases, you can hide the feet of the hedgehogs with that. If you don't. Say if your game table is a barren wasteland. You will want to build up some gravel at the feet of the hogs and paint that in your mud & earth colors. I'll be using static grass and Silflor tufts so there will be no more building.
Drybrush your bases. I started with a middle between the lightest and darkest color. And then a lighter shade of the light color on the lighter colored parts. Just make it look good, ok? This is where you hide the glossy cyano-glue as well. Don't forget that! :)
At this stage you could consider yourself done with the hedgehogs. But we'll take it a step further and add some barbed wire, static grass and pigmenting to make them more alive.
Static grass added. GF9 "dead grass" and Silflor 4mm autumn tufts.
Barbed wire from Games Workshop. It's not the most realistic one out there but I had two rolls of it that needed to be used for something.
Now some pigmenting. Some Aged Rust and Light Rust to the hedgehogs and the barbed wire. Mud and earth pigments here and there on the bases. I also added some black soot to the hedgehogs to represent bullets or shrapnel hitting them. In this stage I drybrushed the static grass a little as well.
Put on some sealant. And... WE'RE DONE!!!
I hope you liked this short tutorial, I sured liked writing it! Please leave a comment with your thoughts and any suggestions for future tutorials.
Most, if not all, of the material used in this tutorial can be found at Antenocitis Workshop. The airbrush used is a Harder & Steenbeck Evolution together with a spray booth from Model Expo Online.


Nice tutorial, I've just started using Vallejo Black Lava on my bases and really like it. I never thought about using it on an already textured base. How do you apply it? I just use a popsicle stick and spread it around with that.
ReplyDeleteThanks! Glad you liked it :D
ReplyDeleteThe GF9 grit can be a little too clean sometimes, so the Black Lava gives it more of a "old school PVA+sand" look. And even on sanded bases it just kinda adds to it.
I use an old blue "Large Drybrush" from Citadel to apply it. But for larger areas that have no grit on it already I do like you do and use a popsicle stick or something similar. It's way easier to build it up than with a brush.
Black Lava is the new black! :)